
„RadioControl“ controls the SSB reception. After
correct adjustment, this program part can work fully automatically.
There is a number of possible adjustments. The received data and
pictures are displayed in MeteoViewer.
MeteoCom is able to receive several channels at once. You can select
each individual channel for adjustments using the channel tabs.
|
The „Radio“ display shows you various adjustment
possibilities, depending on the type of radio being used. This way you
can make manual adjustments to your radio. Make sure to acquaint
yourself with the functions of your radio beforehand. Frequencies are
decreased or increased by clicking the tuning knob in the respective
direction. The frequency step width is selected in „Steps“. You can
click on the frequency readout with your mouse (right click + / left
click -). The segment you click on will be increased or decreased by one
step. Clicking on the „F“ button will open a window in which you can
manually enter a frequency. |
|
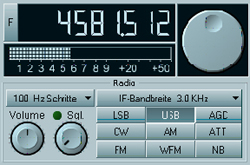
The „USB“, „LSB“, „CW“, „AM“, „FM“
and „WFM“ buttons switch between operation modes. For normal weather
data reception we recommend to use „USB“ at a bandwidth of 3 KHz IF.
“AM” is used for normal broadcast reception at 6 KHz IF. “WFM” is used
for the VHF broadcast band on frequencies between 87 and 106 MHz and an
IF bandwidth setting of 50 KHz.
„SQL“ is the squelch, which suppresses receiver noise in the absence of
a signal. „VOL“ is the volume adjustment of the radio. This control
should never be set to zero, because that would prevent a signal from
getting through to the computer. We recommend to set the volume control
to „AUDIO-CTRL“.
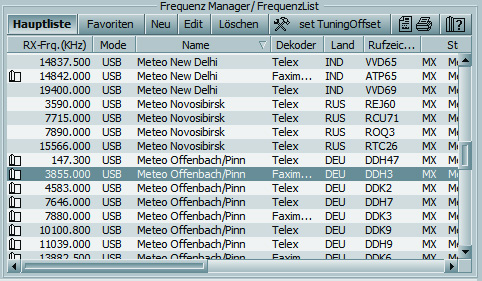
This list comprises all necessary data for the
reception of weather reports. With a double mouse click the radio
station is tuned in on the radio with the correct frequency shift and
the reception program is started with all parameters.
Easy frequency selection: When you have chosen a list entry and
press the space bar, the frequency of the radio will be switched. This
way you can check whether there is any usable reception.
However, if you press Enter or double-click on the list entry the
frequency will be tuned in, the reception program will be launched and
the necessary reception parameters transferred. The reception program is
now ready and will start decoding data.
There are two available lists: „Main-List“ and „Favorites“. You can
arrange the favorites list easily by deleting all radio stations that
are not applicable to your area.
Arranging and Sorting Lists:
If you point your mouse arrow on the dividing lines between the upper
bar and the list, a cross will appear. If you capture the cross with the
left mouse button and pull to the left or right you can adjust the
display width. Clicking on the list areas „RX-Frq“, „Mode“, „Name“ etc.,
will sort the list respectively. This will help you find a particular
radio station.
|
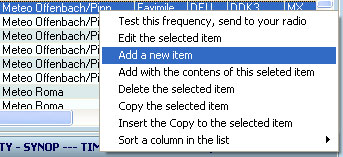
The Context Menu: |
|
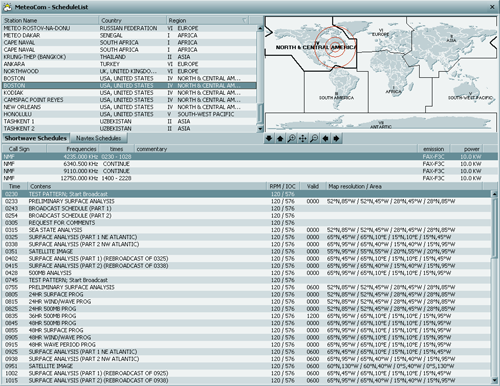
| To set up a timer you first have to know the frequency of the correct radio station and the time of transmission. The „BONITO ScheduleList“ is the proper tool. Since MeteoCom 6 this tool is no longer limited to weather fax but has been expanded to include RTTY and Navtex. |
|
If you press this button in front of a frequency, the „BONITO ScheduleList“ will open. This allows you to receive a Fax Transmitter at your position. Now expand your area on the global map. The radio stations you can receive in your area are automatically marked in the list. If you select one of these stations, all frequencies of this station will be displayed, including all transmitting times. Clicking on one time slot in the transmission schedule will show you the map area covered by this particular transmission. All times indicated are UTC. |
You can select, drag and drop the desired radio station from the Frequency list into the timer list window.
|
|
 |
If you double-click the entry, a
new window opens, indicating the station adjustments. In this window you
can adjust the start and stop time. Please make sure to use UTC at all
times. If you are ready, save the Timer by using the “save” button.
Now you can “active” the timer and MeteoCom starts working
automatically.
|
Tip: |
Soundcard Adjustments
|
Which audio connections does my computer have? |
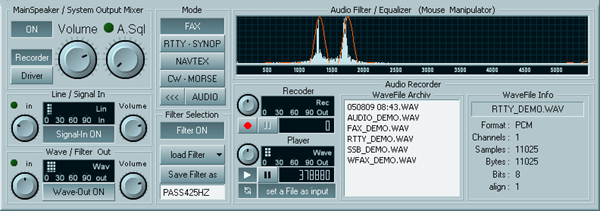
In „AUDIO-CTRL“ you can make changes to all necessary audio adjustments.
„Main speaker on“ toggles the speaker for monitoring. „Volume“ controls
the volume of your PC.
In the „Line/Signal IN“ area you can adjust the volume of the incoming
signal. It is important to adjust the signal in such way that there is
no distortion (red area). In the „Wave/Filter Out“ area you can hear the
filtered signal. In this case it makes sense to deactivate „Signal-In
ON“. Click on „Driver to open the “Audio Mixer Driver Selection” to
choose the microphone connection.
Audio
Driver Config
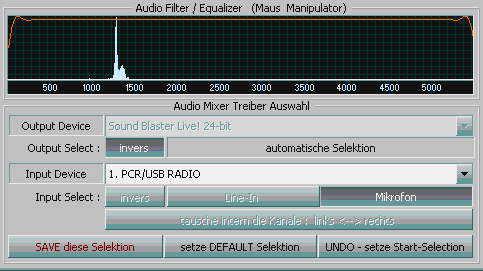
You can change the Audio settings
easily here.
If you click the dropdown menu “Input Select“ you can choose a different
Input source like “Microphone” instead “Line-In” for example. The
denomination may vary depending on the soundcard.
Caution!
Since most microphones are very sensitive, adjust the gain button to the
lower 25% range. Some soundcards offer a microphone boost function. This
function must be deactivated!
Audio-Recorder
|
MeteoCom can also record
spoken weather reports. Just double-click on a broadcast service
that transmits spoken language (e.g. Deutsche Welle) in the
frequency list. If you want to listen to a recording simply
double-click an entry in the „Wave file-Archive“.
Read more About the Soundcard Settings in How to |
|
|
| Web: www.bonito.net - www.hamradioshop.net - www.meteoserver.net - www.wetterinfoshop.de |