Introduction
The program "WeatherInfoViewer” visualizes weather information received
by a WEATHERiNFOBOX from Mörer or downloaded from the Internet. This is
a special OEM development of Bonito. WeatherInfoViewer is a viewer, or
projector, which processes, sorts, classifies and visualizes the
received and downloaded weather information, according to their
properties. In is way, the complexity of the weather information is more
easily understood. It is important to note that this program processes
the weather information according to modern meteorology concepts, using
highly scientific Mesoscale aspects. However, this software does not
produce case-specific statements and forecasts for each weather
situation!! Therefore, we remind you once again to follow the advise of
all weather services around the world:
All weather information are without any guarantee!!!
The WeatherInfoViewer is available
in 2 versions:
1.)The Standard-Version - supports the standard features of the
WEATHERINFOBOX. In addition, it converts the received text messages to
graphical animations. It also records and draws barograph diagrams and
optionally downloads high resolution Weather data from MeteoServer via
the Internet.
2.)The Navigator-Version - offers (in addition to the Standard Version) the
ability to plan a Route on a map similar to a navigation map and it
colours the planned route according to the weather situation.
Both versions are delivered with 14-day trial access to the MeteoServer
Weather data via the Internet. In , both versions can be offered
directly with a 1-year Weather data link via the Internet.
The Navigator- and the Internet weather data- Options can be unlocked at
any time through the Internet. See the Prices for Options in the Price
list or online.
Functional dependencies:
This manual describes the full version with all options. However, some
options are version-specific and will only be available if they are part
of the version you purchased or if you operate the appropriate
WEATHERiNFOBOX which receives the relevant data you expect to see in the
WeatherInfoViewer. For example, if you are using a WEATHERiNFOBOX with a
NAVTEX receiver only, you cannot expect to see any forecasts from the
German Weather Service or see any details based on SYNOP and RTTY data.
Similarly, if your WEATHERiNFOBOX does not have an air pressure sensor,
you will be unable to see any results, even if the Barometer diagrams
are presented. Therefore, please note the following list of useful
package combinations.
Sensible combinations:
Not every WEATHERiNFOBOX receives NAVTEX, RTTY and SYNOP messages. For
example, the WIBE is the only receiving WeatherFax. Also not every
WEATHERiNFOBOX has a built in air pressure sensor.
It makes no sense to operate the WeatherInfoViewer only with a pure
Navtex receiver and without an air pressure sensor. In that case it
would be preferable to purchase the option for Internet weather data.
This version is very modern and useful and it will also compensate for
the lack of options of the receiver. Furthermore, the Internet can be
used with any mobile phone reception and many marinas provide nowadays
Wifi or W-LAN hotspots.
Hence the Internet Weather data option makes sense with any combination.
For the "Navigator" option, you have a simple chart plotter for your
GPS, However, the MeteoRoute function is only useful if additional
Internet data could be downloaded or RTTY weather forecasts can be
received from the DWD.
Which Weather Info Viewer functions
are available for which WEATHERiNFOBOX?
WIBD cannot be connected to a computer, so there is no point orderering
a Weather Info Viewer in this particular case.
WIB2, WIB2B, WIB2BX and WIB2D only receive NAVTEX-Messages, which will
be displayed under Text.
WIB1, WIB3, WIBE receive RTTY- and SYNOP Messages – they will be
displayed in Weather > RTTY/SYNOP and Text.
Only the WIBE can receive WeatherFax Images, which can be viewed and
improved under Images.
WIB2B, WIB2BX, WIB2D, WIB3 and WIBE, are fitted with an air pressure
sensor, the output of which is displayed as a diagram under Weather.
WIB1 doesn’t receive any NAVTEX-Messages.
Trying to display the Barograph option makes sense only if the
WEATHERiNFOBOX has a built in air pressure sensor. WIB1 and WIB2 have no
barograph, therefore no values will be displayed in the diagram under
the category Weather.
-
1.1) System requirements
Windows 7/XP/Vista and 2000. An IBM-compatible PC with Intel Pentium CPU of at least 1GHz and a screen solution of 1280x1024. Additional minimum requirements are specified by the system.
-
1.2) Unpacking the Software WeatherInfoViewer and the WEATHERiNFOBOX:
Check the content of the Bonito Box. You’ll find:
1x CD and a short instruction sheet.
In the WEATHERiNFOBOX package you should find: the WEATHERiNFOBOX, USB- Cable, and driver and Software CD and a manual.
1.3) Connect the WEATHERiNFOBOX
Please connect the WEATHERiNFOBOX to the PC. If you have a WIBE please install the Driver and the WIBE Software from the little disk from your WIBE Package. If you haven't the CD you can download it here: http://www.weatherinfobox.com
-
1.4) Internet connection:
To register the software, connect your PC to the internet or prepare everything to be able to establish an internet connection, if necessary.
! Important for WIBE User ! !
-
1.9) WEATHERiNFOBOX configuration in the "WIBE" Software
You have to configure the WEATHERiNFOBOX in the "WIBE" Software Configuration. Without these configuration the WEATHERiNFOBOX don´t know which Weather information the should receive.
2.)
Installation "WeatherInfoViewer"
Before you start the set up program, connect all the devices as
described above and turn them on. If that does not work properly, follow
the instructions in Chapter 1.
| Important: With Windows 7/Vista you have to execute the Setup.exe as administrator. |
2.1) Insert the CD into your CD drive. You will see the set up program with an entry showing a program key ‘CD-key’ which was burnt on the CD. If the CD does not start by itself, access the root directory of the CD via ‘My Computer’ or the Window Explorer and start the installation procedure by double-clicking ‘Setup.exe.
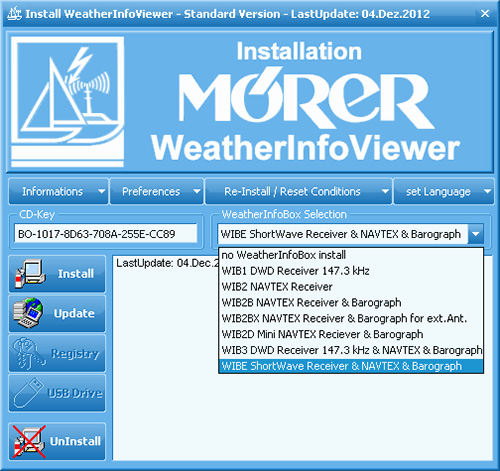
2.2) Select WEATHERiNFOBOX
Normally the WeatherInfoViewer should select the right WEATHERiNFOBOX. If not you can select it every time.
2.3) Installation
Please click to "Install" for installing the Bonito WeatherInfoViewer.
|
More functions of
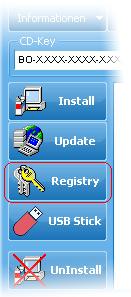
Bonito Setup Preferences: Changing the WEATHERiNFOBOX: Choose a different WIB from the drop down list under „WEATHERiNFOBOX Selection“ and close the Setup. Reinstall: Click to the "Install" Button and all Data's will be in reset. Update: You can update the Bonito Software via the internet by pressing the button ‘Update Service’ the WeatherInfoViewer automatically downloads the updates and installs them. Registry: Here
you can
register or re-activate the program |
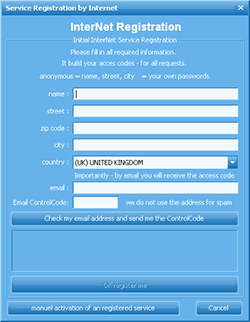
Before using, the WeatherInfoViewer must be registered via the internet. After the installation, the dialogue opens automatically. Should you ignore this, the dialogue will be repeated over and over again instead of starting the program.
|
!
Important ! |
The computer stores the access codes.
You can retrieve them any time and copy them; please, keep
them in a safe place for later re-activation. Additionally,
you will receive the access codes automatically via e-mail.
|
|
|
Important! |
Now go on with "starting WeatherInfoViewer"
|
Have the ‘Registration Access Codes’ handy, which
you were sent via e-mail. In case you are unable to find them,
please, contact us. We can send you your current codes for a fee of
5 €. |
|
|
Open the Set-up Close the Bonito software completely and start the set-up with: [Windows Start] [(all) Programs] [Bonito WeatherInfoViewer] [Setup WeatherInfoViewer]
Setup/Install-Screen |
|
|
Internet Registration
|
|
|
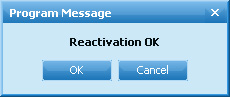
Manual Registration-Reactivation On this screen, you
enter the Access Codes, which you were sent via e-mail when
you first registered. Now click the button ‘Reactivate internet service’ , which will be activated after entering the codes. Should this button not
become active, you did not enter the codes correctly. Check
the accuracy and completeness of the codes. |
|
|
Now go on with "starting WeatherInfoViewer" |
|


|
Bonito is using some Recourse (for example Frequency lists, Timer lists and Program updates), that you can download without extra costs via the internet. There you simply have to click “Update” and the following window appears. |
|

(c) 2012 BONITO Germany |
|
Web: www.bonito.net email: web-form |